🍞Can raw toast dough be frozen? Understanding the principles and practical techniques all at once. Have you ever had to stop baking halfway through because of time constraints? Or do you want to make multiple loaves of toast but are afraid of them changing in texture if stored for too long? Actually, "freezing raw toast dough" is a solution that balances quality and efficiency, but the prerequisite is—you need to know how to freeze, when to freeze, and why! This article starts with the "principles of freezing dough" and combines them with practical "how to store and use raw toast" to teach you all about 【why raw toast dough can be frozen】. ▪️Freezing slows down changes, it doesn't stop time! Below -18°C, yeast temporarily goes dormant, water freezes into ice crystals, and microbial and enzyme activity almost stops, allowing the dough to be stored for several weeks. However, such preservation will still lead to [structural changes] ▪️ Decreased yeast activity: Some yeast will be destroyed by ice crystals, and the fermentation power may be weakened. ▪️ Impact on gluten: Ice crystals will damage the gluten network, resulting in poor extensibility after thawing. ▪️ Risk of oil-water separation: High-oil and high-water content recipes, such as raw toast, are prone to becoming loose and sticky after thawing. 👉 The higher the stability before freezing, the less likely the quality will deteriorate after thawing. [Steps for freezing raw toast dough] Two methods of freezing dough can be used: ▪️ No need for first fermentation. After mixing the dough, roll it out, wrap it in a bag, and freeze it. Directly proceed to "Step 3️⃣" + "Step 4️⃣" to enter the thawing and baking process. ⏰ ▪️ Freeze after first fermentation, dividing, rounding, and shaping. Complete the following steps: 1️⃣ After mixing → First fermentation until 1.5 times the size. It is recommended not to over-ferment. The optimal freezing point is about 70-80%. 2️⃣ Shape into rolls and place in molds or round them for freezing. If you already have a mold, you can shape the product and freeze it directly in the mold; alternatively, you can store it in a round shape, thaw it, and then reshape it. 3️⃣ Pre-cool for 10 minutes → package, seal, and freeze. Pre-cooling helps reduce ice crystal damage, and sealing prevents odors from adhering to the freezer and moisture loss. 4️⃣ Label and store (item + date). Recommended to use within 3 weeks for optimal flavor; quality will significantly deteriorate after one month. [Thawing and Baking Process] ▪️ Refrigerate for 8-12 hours. ▪️ Second Proofing at Room Temperature: Before proceeding, allow the dough to warm to room temperature (place on an energy-saving plate or a regular metal baking tray). Use a temperature gun to measure the dough temperature; if it reaches approximately 20 degrees Celsius, proceed with the next steps. ▪️ Baking Recommendation: Bake at 190°C (top heat) and 210°C (bottom heat) for approximately 22 minutes (I used a low-sugar mold; if using a regular mold, increase the baking time by 3-5 minutes). [Tips to Improve Quality After Freezing] ▪️ Use flour with higher gluten content. ▪️ Increase yeast by 5-10% (to compensate for fermentation loss after thawing). ▪️ Add a little honey to the recipe to help retain moisture and improve elasticity. ▪️ Avoid repeated freezing and thawing, as this will cause the dough to become loose and exhibit significant oil-water separation.
Materials
FL Frozen Raw Toast Dough Preparation: Baking Principles and Steps
The Polish starter was prepared the day before and refrigerated for later use.
Except for the unsalted butter, add the main dough ingredients to the mixer and mix on low speed for 3 minutes, then on medium speed for 6 minutes (until a preliminary thin film can be stretched).
Add softened unsalted butter at room temperature and cook at medium speed for 6 minutes (until the dough can be stretched into a thin membrane).
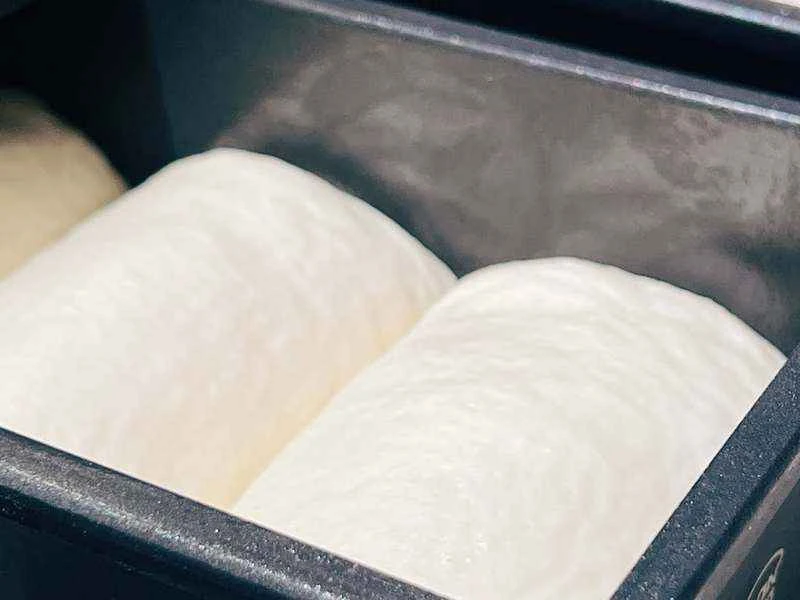
Cover the dough with a damp cloth and let it ferment at room temperature for 1 hour (first fermentation).
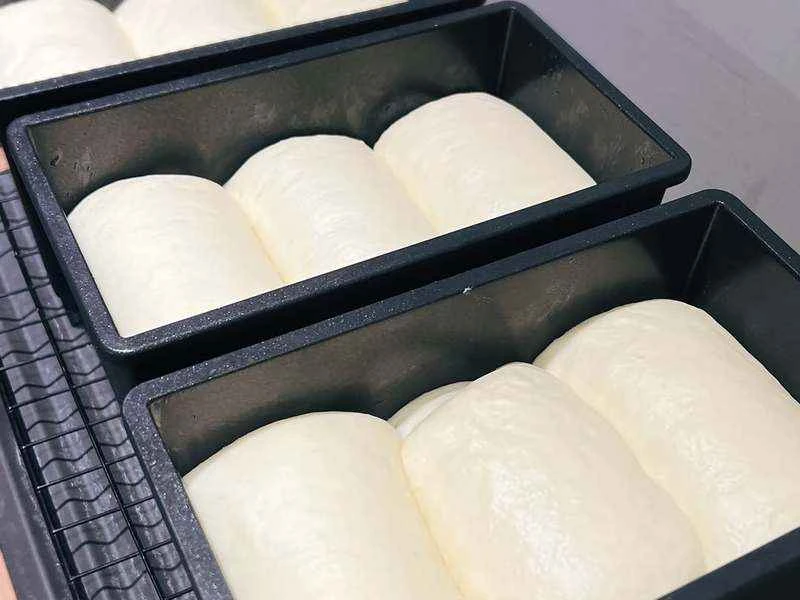
Divide the dough in half, into 270g portions, roll into balls, shape, and let rest for 15 minutes to relax.
After resting, roll and shape the dough for the first time. After resting for 15 minutes, roll and shape it a second time. Place it in a loaf pan, cover with a damp cloth, and let it proof in the oven for 1 hour (second proofing).
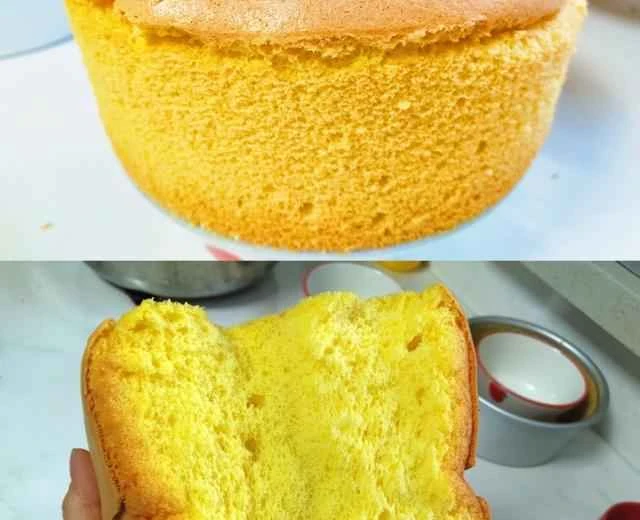
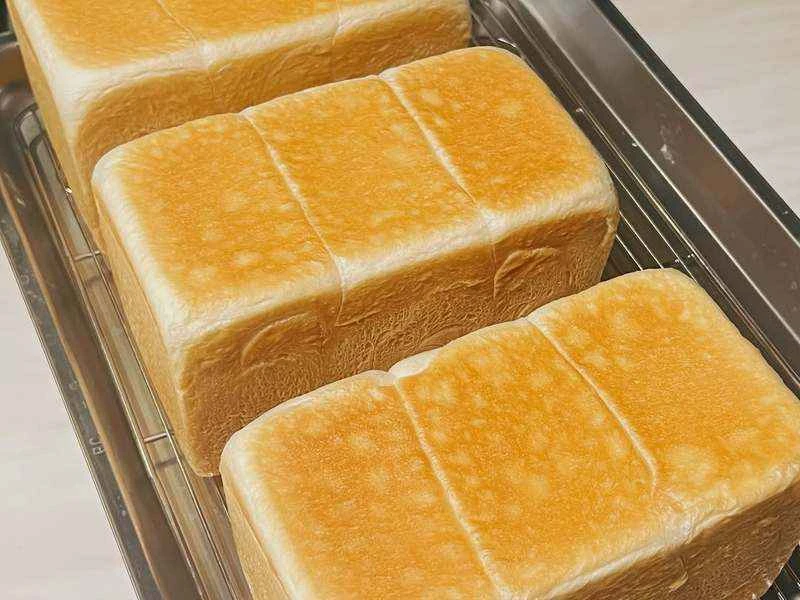
Remove the dough when it has risen to 80% full in the mold. Preheat the oven to 170°C (top heat) and 210°C (bottom heat) and bake for 22-25 minutes (you can reduce the baking time if using a low-sugar mold; if using a regular mold, increase the baking time by 5-8 minutes). After baking, tap the mold on its side, place the loaf upright, and let it cool at room temperature for two hours before slicing (this resting process also helps the dough mature internally, so don't skip it!).
When preparing raw toast, I also use frozen dough in batches. The key is to master: ▪️Timing of freezing: Not the earlier the better, but wait until the gluten is stable and the yeast has just started to work. ▪️Details of freezing method: Sealing + pre-cooling can preserve the elasticity of the dough you've worked so hard to knead. ▪️Expected management of freezing: Currently, my observations show that frozen dough used within 24 hours is not significantly different from dough made on the same day! This allows me to effectively allocate time to produce results. ▪️Although frozen dough can be stored for 2-3 weeks, longer storage will reduce yeast activity, but maintaining 90% of the desired quality is not a problem!

Here's an explanation of pre-cooling: Pre-cooling refers to the process of slowly cooling completed dough or desserts in a cool, but not yet frozen, environment before they are actually frozen. Common locations include: ▪️ Refrigerator compartment (approximately 4°C) ▪️ Air-conditioned room, air conditioner vents (below approximately 20°C) ▪️ Baking room without heating, a well-ventilated, cool place. [Why pre-cool? What's the principle?] The purpose of pre-cooling is to reduce the formation of damaging ice crystals caused by a sudden drop in temperature. Here are the key principles: ▪️ If dough is directly frozen (to -18°C) from room temperature (25~28°C), the moisture will quickly form large ice crystals → damaging gluten, yeast cells, and the overall structure. ▪️ Pre-cooling allows the core of the dough to cool slowly, allowing moisture to condense in smaller ice crystals, better maintaining the gluten network and cell integrity. ▪️ Particularly suitable for high-hydration, high-fat doughs (such as raw toast, brioche, and milk dough).