![[Repost] Strawberry Chocolate Cake (by teak & thyme)](/upload/20260210/a4a5976dd542ca.webp)
# Why You'll Love This Recipe - Soft and Rich Chocolate Cake: This is my go-to chocolate cake recipe. Every time I make it, it's incredibly rich and flavorful, a truly perfect result. - Strawberry Jam with Fresh Strawberry Filling: The fragrant and juicy strawberry filling perfectly balances the richness of the chocolate, making it refreshingly light. - Strawberry Cream Cheese Frosting: Simply add a touch of strawberry jam to easily enhance the flavor and color of basic cream cheese frosting. It's simple and delicious. - Simple and Easy Decoration: No piping tips or complicated designs required. I especially love the natural texture of strawberries decorating cakes; it's the kind of rustic cake I've always dreamed of. # Tools Needed - 6-inch Round Cake Pan: This recipe makes enough for two thick 6-inch cake layers. You can keep the thick layers or cut each layer in half like I did, creating four standard-thickness cake layers. Alternatively, you can divide the batter into three 6-inch cake pans to make a three-tiered cake. - Electric Hand Mixer: A hand mixer is very convenient for quickly mixing softened butter and cream cheese to make frosting. While not essential for this recipe, it's highly recommended if you bake frequently. If you don't have a hand mixer, you can use a spatula to make frosting, just make sure the butter and cream cheese are fully softened beforehand. - Cake Turntable (Optional): Not essential, but it makes frosting cakes easier and more enjoyable. A metal turntable with smooth rotation is recommended. - Piping Bag: Use a piping bag to pipe a ring of frosting onto each cake layer to prevent jam fillings from leaking out from the sides. If using store-bought jam with a thick consistency, this step can be omitted. - Angled Spatula: Very practical for spreading frosting evenly on cakes. Its ergonomic shape also makes it suitable for various other baking tasks. It's recommended to have one small and one large: the small one for spreading fillings or frosting small cakes, and the large one for frosting larger cakes. - Cake scraper (optional): A cake scraper or countertop scraper can help remove excess frosting from the sides of the cake, creating a smooth surface. This cake has a natural texture and doesn't need to be as perfectly smooth as a buttercream cake, but a scraper can still help distribute the frosting evenly, ensuring a consistent thickness throughout the cake.
Materials
[Repost] Strawberry Chocolate Cake Recipe (by teak & thyme)
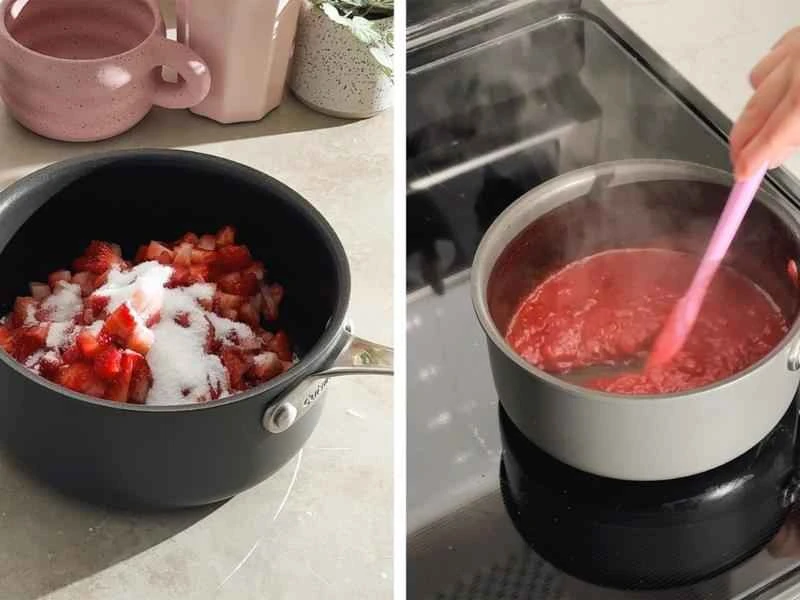
Strawberry Jam Making Steps: In a small saucepan, combine strawberries, granulated sugar, and water, stirring constantly. Heat over medium-high heat, stirring occasionally, until the mixture boils. Be careful as foam may overflow at this point. Continue heating until the boiling subsides and the mixture thickens to a jam-like consistency. To check if the jam is ready: run a spatula through the jam; if a clear line is left and the line gradually closes up after a few seconds, the jam is complete.
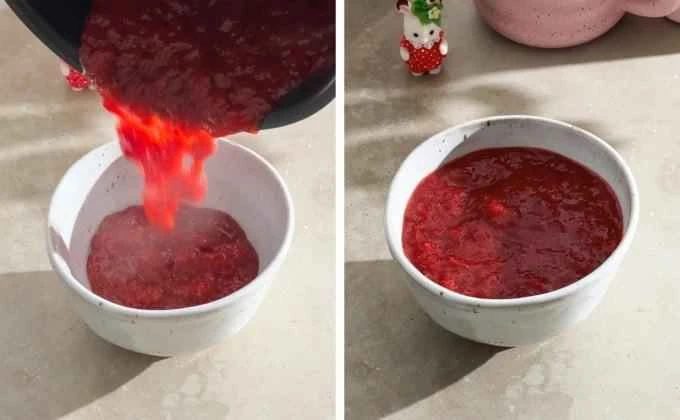
Pour the jam into a small bowl and refrigerate until completely chilled. Remove it when needed.
Chocolate cake making steps: Preheat oven to 175°C. Line the bottom of two 6-inch round cake pans with round parchment paper and set aside.
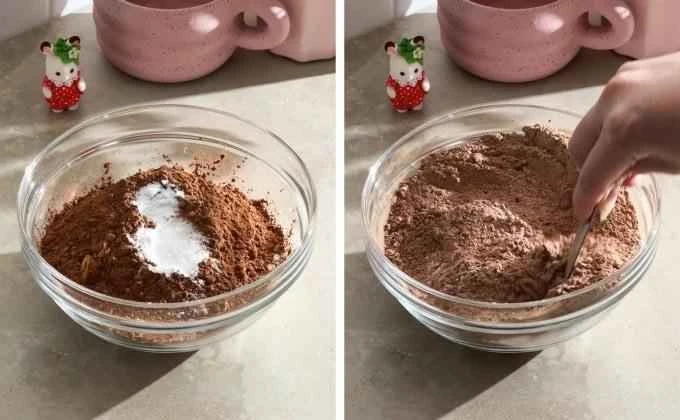
In a medium bowl, combine the dry ingredients. Using a whisk, mix the flour, cocoa powder, baking powder, baking soda, and salt until smooth. Set aside.
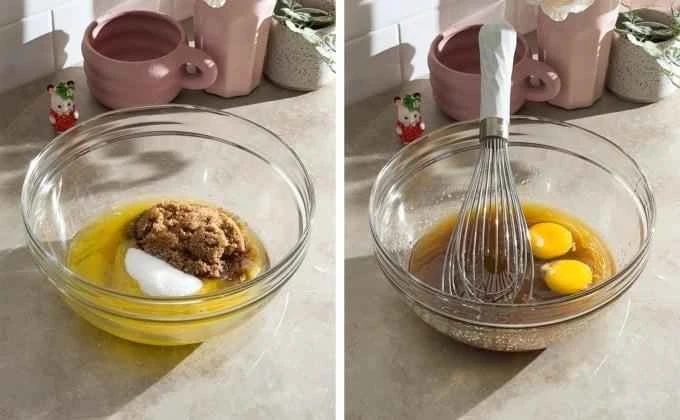
Mixing wet ingredients: In a large bowl, use a whisk to mix the melted butter, cooking oil, granulated sugar, and brown sugar (or dark brown sugar) until smooth. Then add the eggs and continue mixing until the batter is smooth and free of lumps.
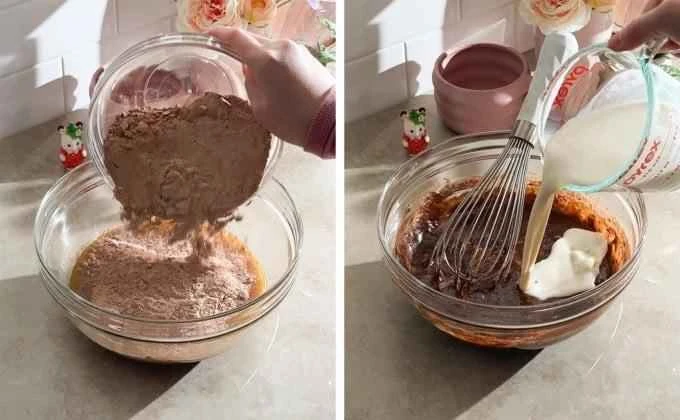
Alternately add dry ingredients and milk: Add the dry ingredient mixture and milk to the wet ingredients in two alternating batches: First, pour in half of the flour mixture and whisk on low speed until just combined (about 10 seconds). Then, pour in half of the milk and whisk until no liquid residue remains. Repeat this step, adding the remaining flour and milk, until a smooth and even batter is formed. Throughout the process, avoid overmixing to prevent excessive gluten development, which would result in a hard cake. The illustrations (from left to right) show the process of pouring the flour mixture into the wet ingredients bowl and the process of pouring milk into the chocolate cake batter. This alternating addition must strictly follow the order of "powder → milk → powder → milk" to ensure a stable emulsion system.
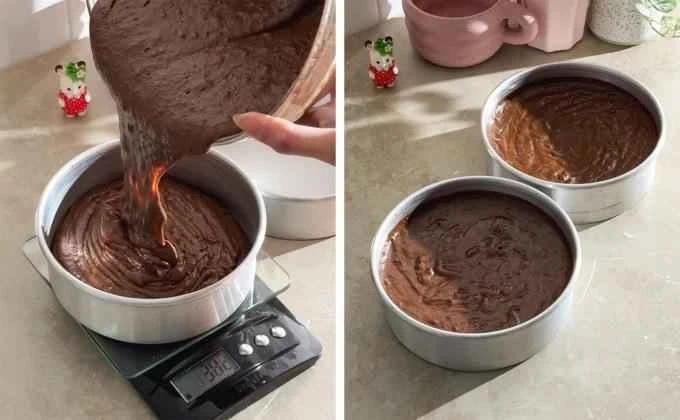
In the portioning step, pour the mixed batter evenly into two pre-prepared 6-inch cake molds (approximately 540 grams of batter per mold). It is recommended to use a kitchen scale to ensure the two cake layers are of equal thickness. If you don't have a scale, you can pour the batter into the molds in batches, gently tapping the edges of the molds with a spatula to smooth the batter, or hold the molds and gently tap them on the counter 2-3 times to release large air bubbles and smooth the surface. The illustrations (from left to right) show the batter being poured into the molds using a scale (left) and the two molds already filled with batter (right). Note that the batter should not exceed 2/3 of the mold's height to prevent overflow during baking.
Place the mold in the middle rack of a preheated oven at 175°C and bake for 40-45 minutes. Temperature control: Oven temperatures vary greatly, so it is recommended to check the cake surface after 30 minutes of baking. If it browns too quickly, cover it with aluminum foil to prevent burning. To check if the cake is done, use a toothpick test: Insert a toothpick into the center of the cake. If a small amount of moist breadcrumbs adhere to the toothpick but no liquid batter remains, the cake has reached the ideal moisture level. If the toothpick comes out completely clean, it may be overbaked and will be too dry.
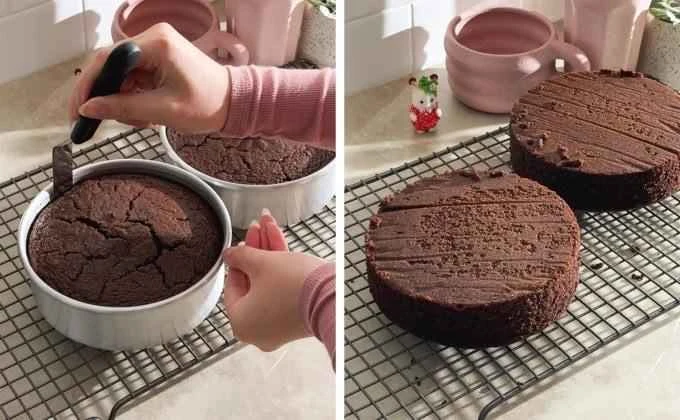
Place the baked cake, along with its mold, on a cooling rack and let it rest for about 10 minutes. Using a curved spatula, gently run it along the inside of the cake mold. Invert the mold onto a pre-prepared metal cooling rack and gently tap the bottom to release the cake. If using a springform pan, push the cake out from the bottom; for a solid-bottom pan, use a spatula to support the bottom as you move it. Then, place the cake right-side up on the cooling rack, ensuring good air circulation, and allow it to cool completely to room temperature (about 1-2 hours).
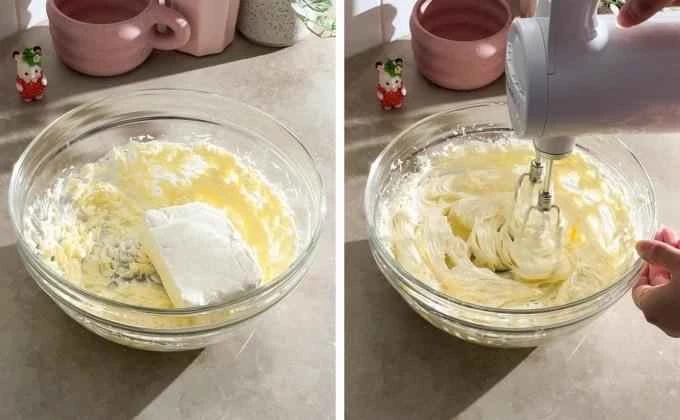
In a large bowl, combine the butter and cream cheese. Using an electric hand mixer, beat the softened butter until very smooth and fluffy. Add the cream cheese and continue beating until the cream cheese is completely smooth and free of lumps, resulting in a fine and soft overall texture.
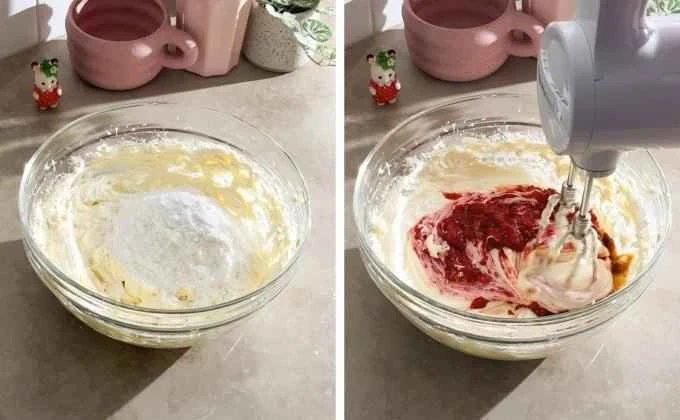
Whisk the icing sugar into the powdered sugar on low speed until fully combined. Pour in the strawberry jam and vanilla extract, and continue whisking until well combined. Pause once during this process to scrape down the sides of the bowl with a spatula. Transfer a small amount of icing to a piping bag and trim the tip (to control the size of the tip as needed to prevent leaks when piping).
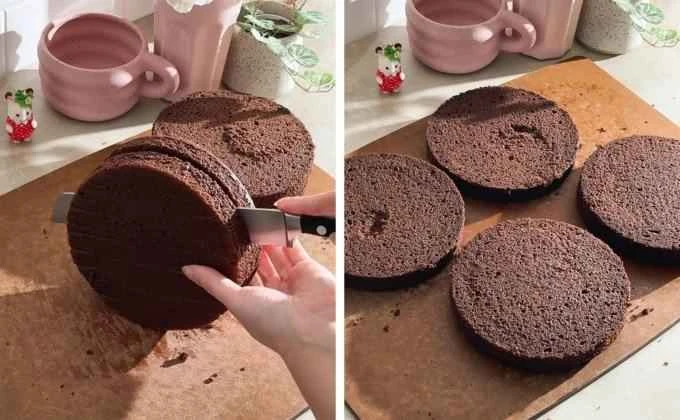
To assemble the cake, prepare the cake base by trimming the surface of the cake base with a serrated knife (if there is a dome on top, it needs to be flattened). Then cut each cake base in half to get a total of four cake bases. (From left to right) The left picture shows a piece of chocolate cake base cut in half, and the right picture shows four cake bases placed on a cutting board.
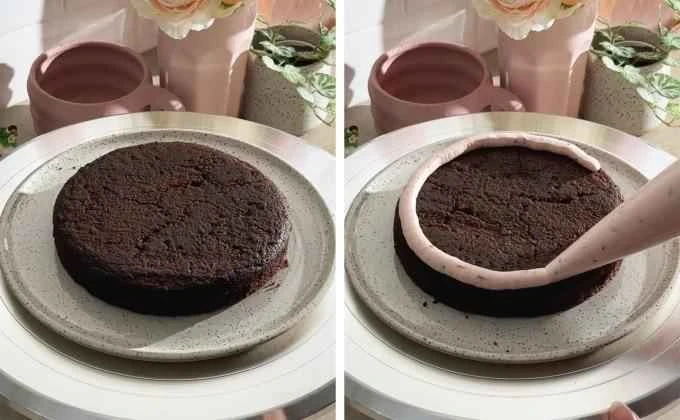
To pipe the royal icing ring, place the cake turntable on a stable surface and place the first cake layer on top. Using a piping bag filled with royal icing, pipe a ring of royal icing around the edge of the cake layer (forming a closed ring to prevent the filling from overflowing). (From left to right) The left image shows a cake layer placed on the cake turntable, and the right image shows the process of piping a royal icing ring around the edge of the cake layer.
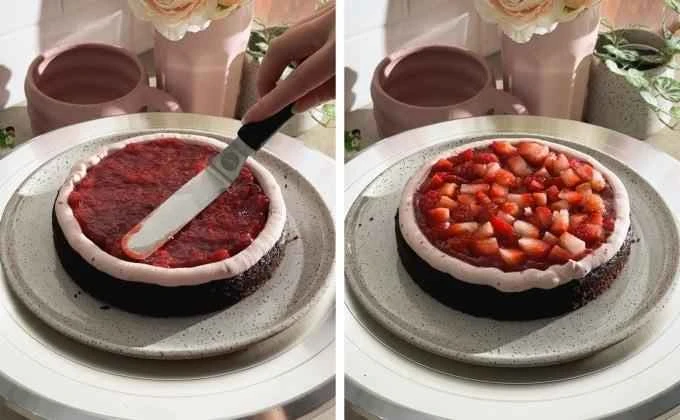
To fill the filling, add about 4 tablespoons of strawberry jam to the center of the icing ring and smooth it out into an even layer using a slanted spatula. Top with diced strawberries and arrange them into a smooth, even layer.
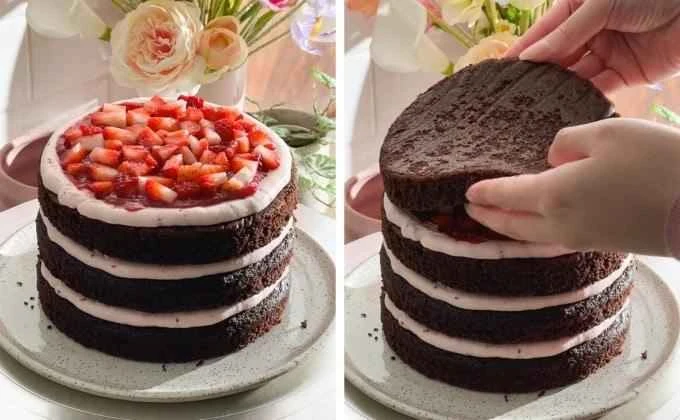
Repeat the process of filling and stacking cake layers, adding the next cake layer on top, until all cake layers and fillings are used up (ultimately forming a structure of four cake layers + three layers of filling). (From left to right) The left image shows the strawberry filling stacked on the third cake layer, and the right image shows the process of placing the last cake layer on top.
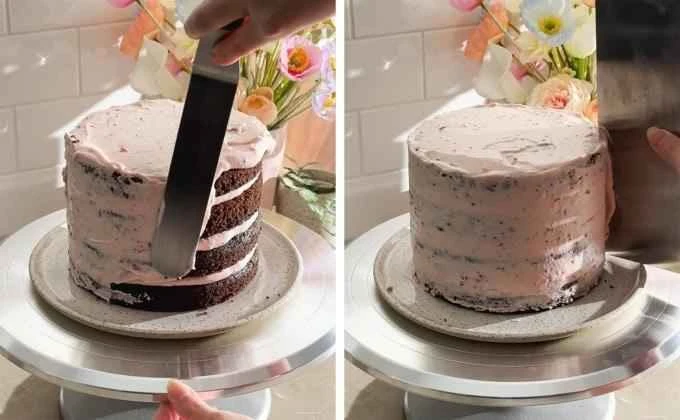
Apply a crumb coat. Spread a thin layer of strawberry cream cheese frosting over the entire surface and sides of the cake as a crumb coat. Gently scrape away any excess frosting with a cake scraper, leaving only a thin layer to cover the cake surface. (Note: The key function of the crumb coat is to seal in cake crumbs, preventing them from getting mixed into the frosting when applying the outer layer later, resulting in a cleaner and smoother final cake surface.)
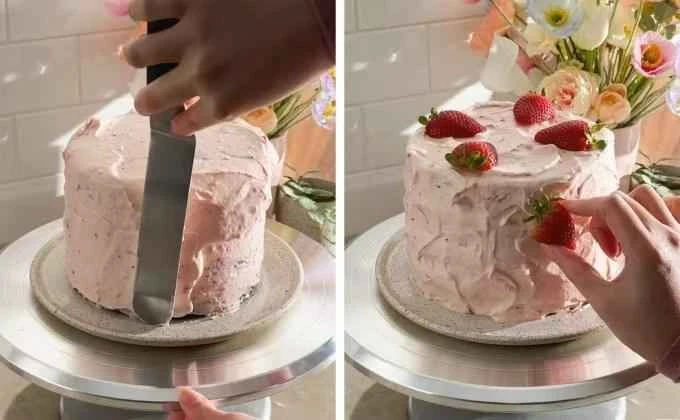
Apply the outer layer of royal icing and decorations over the edge frosting. Spread a layer of strawberry cream cheese frosting evenly as the outer layer, and smooth the surface and sides with a cake scraper. Gently swirl the frosting surface with the scraper to create natural swirl patterns. Finally, press halved strawberries onto the top of the cake to complete the decoration.
The original author thoughtfully provided a nutrition facts label: Calories: 797 kcal; Carbohydrates: 84 g; Protein: 10 g; Fat: 51 g; Saturated Fat: 25 g; Polyunsaturated Fat: 9 g; Monounsaturated Fat: 13 g; Trans Fat: 1 g; Cholesterol: 139 mg; Sodium: 410 mg; Potassium: 452 mg; Dietary Fiber: 6 g; Sugar: 55 g; Vitamin A: 1275 IU; Vitamin C: 52 mg; Calcium: 166 mg; Iron: 3 mg.
[Repost] Tips for making Strawberry Chocolate Cake (by teak & thyme)
Frequently Asked Questions (FAQ) 1. Can this cake be made using an 8-inch mold? Yes. To scale the recipe to an 8-inch mold, the precise conversion ratio is 1.78 times the total ingredient quantities. To simplify the process and avoid complex decimals, it is recommended to multiply by 2. Baking time will need to be extended by a few minutes, and you should also visually assess doneness (e.g., the cake surface is firm and springs back when gently pressed). 2. Why are ingredient quantities labeled in grams? And why are grams mixed with tablespoons/teaspoons? In baking, weight measurement is much more accurate than volume measurement. When using standard US measuring cups, ingredients such as flour and sugar are easily compacted, resulting in an over-measured amount and affecting the texture of the finished product. Recipes using weight measurements are easier to scale (whether increasing or decreasing quantities), eliminating the need for complex fractions; a kitchen scale is sufficient. Small amounts of ingredients (e.g., 1/4 teaspoon) are labeled in tablespoons/teaspoons because most kitchen scales are not accurate enough for quantities below 10 grams. Unless you have a professional precision balance, it is difficult to accurately weigh extremely small quantities. This mixed measurement method is common on other recipe websites and in professional kitchens. Storage: This strawberry chocolate cake can be stored in an airtight container in the refrigerator for up to 3 days. For best taste, allow it to come to room temperature before serving. Leftover cake can be stored in an airtight container, or properly wrapped in plastic wrap or aluminum foil and frozen for up to 1 month. To thaw, refrigerate overnight or leave at room temperature for 1-2 hours until completely thawed.